Archive for October 2014
Use of Event Delivery Network (EDN) : Tutorial - POProcessing

You add a new mediator component called receivePO, which subscribes to an event called NewPO and sends the received PO to the routePO service.
1. Open the POProcessing application in JDeveloper and open composite.xml, and click on the Event Definition Creation icon:

2. In the Event Definition Creation window, enter POEvents as the name of the event definition. Accept the namespace value generated.
3. Add a new event by clicking on the + icon.
4. Select the PuchaseOrder element from the po.xsd file using the chooser.
5. Enter NewPO as the name of the event and click on OK to close the Add an Event window.

6. Click on OK to complete the event definition.
7. Close the POEvents.edl panel.
8. Save all.
Subscribing to the NewPO event
1. Drag-and-drop a Mediator component onto the composite.
2. Name the mediator receiveNewPO.
3. Select Subscribe to Events for the Template.
4. Click on the + to add an event. Select the NewPO event from the Event Chooser window.

5. Click on OK to accept and create the mediator.
6. Save all.
7. Connect the receiveNewPO mediator to the routePO mediator:

8. Double-click on the receiveNewPO mediator and define a new transformation map. In the transformation-map, map the all the fields from the source to the target.
9. Close the mediator and save all.
Deploying and testing
1. Deploy the POProcessing composite to the server.
2. Browse to the EM console at http://localhost:7001/em.
3. Right-click on folder soa-infra (soa_server1) under folder SOA:

4. Click on item Business Events.
5. You should see the Business Events management page with the NewPO event listed in the Events tab.

6. Select the event and click on the Test… button to publish the event.
7. In the pop-up window, enter the following XML and click on Publish:
<PurchaseOrder xmlns="http://xmlns.oracle.com/ns/order">8. You should get a "The Event published successfully" message.
<CustID>1111</CustID>
<ID>33412</ID>
<productName>Sony Bluray DVD Player</productName>
<itemType>Electronics</itemType>
<price>350</price>
<quantity>5</quantity>
<status>Initial</status>
<ccType>Mastercard</ccType>
<ccNumber>1234-1234-1234-1234</ccNumber>
</PurchaseOrder>
9. Click on soa-infra in the navigation panel on the left to get the soa-infra dashboard.
10. Click on the POProcessing composite to view new instances. You should see an instance created for processing the event you just published. Click on the instance ID to view the flow trace.

Event Delivery Network (EDN)
The Event Delivery Network (EDN) in Oracle SOA Suite 11g provides a declarative way to use a publish/subscribe model to generate and consume business events without worrying about the underlying message infrastructure.
Developers only need to produce or consume events without having to deal with any particular messaging API like JMS, AQ, and MQ, and so on.
EDN uses an XML-based Event Definition Language(EDL), which allows you to define the event and its associated, strongly typed data. This definition is then registered with the SOA Infrastructure and is available to all composites to publish or subscribe.
This allows for a fully-declarative, business-oriented, rather than developer-oriented approach for using events in a SOA application.
Another feature of EDN is the ability to publish and subscribe to these events from a variety of programming environments such as Java, PL/SQL, SOA Composites, and ADF-BC applications.
Creating and managing event definitions
Events are defined using an Event Definition Language (EDL), an XML schema used to build business event definitions.
An EDL consists of the following:
- A global name.
- Custom headers: These can be used for content-based routing without having to parse the XML payload and apply XPath queries to get at the value to be used for the routing decisions.
- Payload definition: Typically this is an XML schema for the business data that needs to accompany the event.
If you want to raise events on one or more database operations such as insertion of a new row or update of an existing one, you can use ADF-BC to define these events.
Registered events, their subscribers, and any faulted deliveries can all be tracked and monitored using the Oracle Enterprise Manager.
Consuming events from the Event Delivery Network
The first step to consume an event is to discover its definition. Event definitions can be stored locally in a composite or globally on the server—in either case, they can be discovered through the JDeveloper resource catalogue.
To subscribe to an event within an SOA composite application, you start by defining a Mediator component, selecting the event of interest from a list of registered events in the network.
To further refine a subscription, and narrow down the information you will receive, you can define an XPath-based filter on your subscriptions.
For example, for an event named "NewPOCreated", you could either subscribe to all "NewPOCreated" events (default when no filter is defined) or only those where the order amount is more than a million dollars (by defining an XPath-based filter on the order amount field within the payload).
Perform message validation in OSB using Validate action

The Validate action can be used to check the content of any variable against an element or
type of an XML schema. The validation can be configured to either save the Boolean result of
the validation in a variable or to raise an error if the validation fails. An error will hold the error
code BEA-382505 and the message will hold further details about the failed validation.
By using the XPath expression, it's also possible to only check fragments, inside a larger XML
message, for validity.
We will show how to use the Validate action to perform message validation.
In Eclipse OEPE, perform the following steps:
1. Open the MessageValidation proxy service and navigate to the Message Flow tab.
2. Insert a new stage into the MessageProcessingPipelinePair and name it MessageValidationStage.
3. Insert a Validate action into the stage.
4. On the Properties tab of the Validate action, enter body into the In Variable field.
5. Click <XPath> and enter ./cus:Customer into the Expression field. Click OK.
6. Click Browse to the right of Against Resource and select the Customer (element) in the xsd/Customer.xsd XML Schema. Click OK.
7. Select the Raise Error option.
8. Deploy the project to the OSB server.
Now let's test the validation of our proxy service. In the Service Bus console, perform the following steps:
9. In the Project Explorer navigate to proxy folder inside the using-validate-to-domessage-validation project.
10. Click on the Launch Test Console icon of the MessageValidation proxy service.
11. Enter a message with an invalid CardIssuer (only the lowercase values visa and mastercard are valid) and click Execute.

12. The Validate action will raise a validation error, which is shown in the following screenshot:

Using dynamic Split-Join to perform work in parallel in OSB
We have seen how the OSB's advanced mediation feature, called Split-Join, can help to improve the performance of the service by concurrently processing individual parts of a message. The Split-Join first splits the input message payload into submessages (split), processes these submessages concurrently and then aggregates the responses into one return message (join). In our case, the splitting has been done on the collection of addresses in the customer request message and the concurrent processing involves the invocation of the Address Checking Service in parallel.
Split-Joins are useful for optimizing the overall response time when parts of the request messages need to be processed by slower services, that is, each individual address has to be handled by a call to the Address Checking Service, taking four seconds to respond. Because of the parallel nature, the whole Split-Join finishes in little more than four seconds. This is a huge benefit compared to the solution with the For Each action shown in the Using the For Each action to process a collection recipe.
The Split-Join of the Oracle Service Bus comes in two flavors:
- Static Split-Join – branches from the main execution thread of the OSB message flow by splitting the payload into a fixed number of branches according to the configuration of the Split-Join at design time.
- Dynamic Split-Join – branches from the main execution thread of the OSB message flow by dynamically creating new branches according to the contents of the incoming payload. Conditional logic is used to determine the number of branches at runtime.
We will use the Split-Join functionality of the Oracle Service Bus to handle outgoing service callouts in parallel instead of the usually used sequential method.
A Split-Join is a separate artifact, which we will create first. In Eclipse OEPE, perform the following steps:
1. Create an additional folder flow in the project using-dynamic-split-join.
2. Right-click on flow and select New | Split-Join.
3. Enter SplitJoin into the File name field and click Next.
4. Navigate to the operation: StoreCustomer node of the CustomerManagement.wsdl file and click Finish.
5. The SplitJoin flow artifact will be shown in the detail window.
6. Drag a For Each operation from the Flow Control section of the Design Palette to the flow between Receive and Reply.

7. On the Properties tab of the For Each operation, click <Counter Name> and enter counter into the Counter Variable Name field on the pop-up window. Click OK.
8. Enter number(1) into the Start Counter Value field.
9. Enter count($request.parameters/Customer/cus:Addresses/cus:Address) into the Final Counter Value field.
10. Drag an Invoke Service operation from the Communication section of the Design Palette into the For Each operation.
11. On the Properties tab of the Invoke Service operation, click Browse and select the operation: CheckAddress node from the AddressChecking business service in the business folder.
12. Click OK.
13. Navigate to the Input Variable tab and select the Create Message Variable item of the Message Variable drop-down listbox.
14. Enter addressCheckRequest into the Name field and click OK.
15. Navigate to the Output Variable tab and select the Create Message Variable item of the Message Variable drop-down listbox.
16. Enter addressCheckResponse into the Name field and click OK.
17. Drag an Assign operation from the Assign Operations section of the Design Palette and drop it before the Invoke Service operation.
18. On the Properties tab of the Assign, select addressCheckRequest.parameters from the Variable drop-down listbox.
19. Click on <Expression> and enter the following XML fragment into the Expression field:
<add:CheckAddress20. Click OK.
xmlns:add="http://www.osbcookbook.org/AddressCheckingService/">
{$request.parameters/Customer/cus:Addresses/cus:Address[$counter]}
</add:CheckAddress>
21. Drag an Assign operation from the Assign Operations section of the Design Palette and drop it after the Invoke Service operation.

22. On the Properties tab of the Assign, select response.parameters from the Variable drop-down listbox.
23. Click on <Expression> and enter the following XML fragment into the Expression field:
<out>COMPLETED</out>
We have successfully created the Split-Join flow artifact. Now, let's create the business service, which will invoke the Split-Joint through the flow transport. The business service can easily be generated by performing the following steps in Eclipse OEPE:
24. Right-click on the SplitJoin.flow artifact and select Oracle Service Bus | Generate Business Service.
25. Select the business folder in the Service Location tree and enter SplitJoin into the Service Name field and click OK.
Now, let's add the call of the business service to the already existing SplitJoinInvoker proxy service. In Eclipse OEPE, perform the following steps:
26. Open the SplitJoinInvoker proxy service and navigate to the Message Flow tab.
27. Insert a Route node into the StoreCustomer branch and name it InvokeSplitJoinRoute.
28. Insert a Routing action into the Route node.
29. On the Properties tab of the Routing action, click Browse and select the SplitJoin business service. Click OK.
30. Select the StoreCustomer operation from the Invoking drop-down listbox.
31. Deploy the project to the OSB server.
Now, we can test the proxy service. In the Service Bus console, perform the following steps:
32. In the Project Explorer navigate to proxy folder inside the using-dynamic-split-join project.
33. Click on the Launch Test Console icon of the SplitJoinInvoker proxy service.
34. Select the StoreCustomer operation from the Available Operations drop-down listbox.
35. Enter a message with two addresses into the Payload field as shown in the following screenshot:

36. Click on Execute.
37. It should not take more than four seconds until the Test console response window is shown (each single Address Checking Service call is taking four seconds to answer).
38. Click Back to retest.
39. Enter a message with four addresses into the Payload field and click Execute.
40. It should still take about four seconds until the response window is shown. The four calls to the Address Checking Service are done in parallel.
Using the Java Callout action to invoke Java code
We have created a Java class, packaged it as a JAR and invoked it from the OSB proxy service through a Java Callout action. Only static methods can be invoked through the Java Callout action; other, non-static methods will not be shown when browsing the classes/methods.
The JAR is deployed with the OSB project to the OSB server and it will always run inside the OSB server.
We will show how we can use a Java Callout action to invoke Java code, which might already exist. This is an easy way to extend the standard functionality of the service bus.
We will use the Java Callout action to call a Java method which returns the Checksum of the message passed as the parameter. The functionality of calculating a checksum is not available as an XPath/XQuery function and adding it through a Java Callout action is of course much simpler and more efficient than using a real web service.
We will first create the Java project with the Java class holding the checksum calculation functionality. In Eclipse OEPE, perform the following steps:
1. Right-click on the Project Explorer and select New | Project.
2. Enter java into the Wizards field, select Java Project and click Next.
3. Enter osb-checksum-util into the Project name field.
4. Click Finish and confirm the pop-up window with Yes to switch to the Java perspective.
5. Right-click on the osb-checksum-util project and select New | Class.
6. Enter osbcookbook.util.checksum into the Package field.
7. Enter ChecksumUtil into the Name field and click Finish.
8. Implement the following static method inside the ChecksumUtil class:
public static long calculateChecksum(String data) {
Checksum checksum = new CRC32();
checksum.update(data.getBytes(), 0,
data.getBytes().length);
return checksum.getValue();
}
9. Right-click on the source and select Source | Organize Imports.By doing that, the checksum functionality is ready to be used. In order to invoke it through a Java Callout, it needs to be packaged into a Java Archive (JAR) file and copied into the OSB project. In Eclipse OEPE, perform the following steps:
10. Right-click on the osb-checksum-util project and select Export.
11. Enter java into Select an export destination and select JAR file.
12. Click Next.
13. In the Select the resources to export tree, select the osb-checksum-util project.
14. Click Browse right to the JAR file drop-down listbox.
15. Navigate to the jar folder inside the using-java-callout-to-invoke-java OSB project, enter osb-checksum-util.jar into the File name field and click Save.
16. Click Next and then Finish.
Now, let's switch to the OSB project and implement the proxy service calling our new Java calls through a Java Callout. In Eclipse OEPE, perform the following steps:
17. Switch to the Oracle Service Bus perspective.
18. Refresh the jar folder inside the using-java-callout-to-invoke-java project by pressing F5 and check that the JAR file created previously is located inside the jar folder.
19. Create a new proxy service inside the proxy folder and name it Checksum.
20. On the General tab, select Messaging Service for the Service Type option.
21. Navigate to the Messaging tab and select Text for both the Request Message Type and Response Message Type option.
22. Navigate to the Message Flow tab.
23. Insert a Pipeline Pair node and name it CalculateChecksumPipelinePair.
24. Insert a Stage into the Request Pipeline and name it CalculateChecksumStage.
25. Insert a Java Callout action into the stage.
26. On the Properties tab of the Java Callout action, click Browse to select the method to call.
27. Navigate to osb-checksum-util.jar in the jar folder of the project and click OK.
28. Select the public static long calculateChecksum(java.lang.String) method and click OK.
29. Click <Expression> and enter $body/text() into the Expression field and click OK.
30. Enter checksumValue into the Result Value field.

We have added the Java Callout action to invoke our Java method and after that the checksum value is available in the checksumValue variable. Let's add a Replace action to return the checksum in the body variable. In Eclipse OEPE, perform the following steps.
31. Insert a Replace action after the Java Callout action.
32. Enter $checksumValue into the Expression field.
33. Enter body into the In Variable field.
34. Deploy the project to the OSB server.
Now let's test the proxy service by performing the following steps in the Service Bus console:
35. In the Project Explorer navigate to proxy folder inside the using-java-callout-toinvoke-java project.
36. Click on the Launch Test Console icon of the Checksum proxy service.
37. Enter some text to calculate the checksum on into the Payload field and click on Execute.
38. The output of the Java Callout action and the checksum calculation will be shown in the Response Document section.

Using the Publish action to asynchronously invoke a service
We will use the Publish action to asynchronously invoke a service from the proxy service message flow, without having to wait for the calling service to finish its processing.
For this recipe, we have an external Processing Service, available as a soapUI mock service which takes quite some time to do its processing. The interface in the Processing Service WSDL is defined synchronous. We have a business service Processing which allows us to invoke the external service from a proxy service.
Instead of directly invoking the business service from the Publish proxy service, an additional proxy service Processing is added, which only exposes a one-way interface. By doing that, the Publish proxy service can use a Publish action to invoke the Processing proxy service without having to wait for external service to complete.
Let's implement the Publish proxy service, which will use the Publish action to invoke the Processing proxy service. In Eclipse OEPE, perform the following steps:
1. Create a new proxy service in the proxy folder and name it Publish.
2. On the General tab select Any XML Service for the Service Type option.
3. Navigate to the Message Flow tab.
4. Insert a Pipeline Pair node and name it PublishPipelinePair.
5. Insert a Stage node into the Request Pipeline and name it PublishStage.
6. Insert a Publish action into the Stage.
7. On the Properties tab of the Publish action, click Browse.
8. Select the Processing proxy service inside the proxy folder and click OK.
9. Insert a Log action after the Publish action.
10. On the Properties tab of the Log action, click <Expression> and enter 'Publish completed, continue with processing in Publish proxy service' into the Expression field.
11. Click OK.
12. Select Warning from the Severity drop-down listbox.
13. Deploy the project to the OSB server.
Now, let's test OSB project by performing the following steps in the Service Bus console:
14. In the Project Explorer navigate to proxy folder inside the using-publish-to-asyncinvoke- service project.
15. Click on the Launch Test Console icon of the Publish proxy service.
16. Leave the Payload field empty and directly click Execute.
17. The output of the Log action from the Publish proxy service should be shown first in the Service Bus console window, followed a few seconds later by the output of the Log action from the Processing proxy service, which is shown after the external service has completed its work.
Difference between a Service Callout and a Routing action
A Routing action can only be used inside a Route node and will always have to be placed at the end of the proxy service message flow. No other actions can follow a routing node in the message flow. The Routing action will define where the request thread stops and where the response thread starts. The request and response pipeline of an OSB proxy service are always executed in two different threads. A Routing action supports both request/response as well as one-way message exchange patterns.
The Service Callout action can be placed anywhere where an OSB action is valid. There is no limit for the number of Service Callout actions which can be used. A Service Callout placed in the request pipeline will be performed by the request thread, a Service Callout in the response pipeline by the response thread. A Service Callout only supports the request/ response message exchange pattern and will always be synchronous, that is, it waits for the response message.
Using Service Callout action to invoke a service
We have used the Service Callout action in this recipe to invoke an additional service besides the one already called through the Routing action. By doing that, we are able to, for example, enrich a message, either before or after doing the routing. In our case, we have added the credit card information to the canonical response message returned to the consumer. By adding the Service Callout action into the Response Action of the Routing action, we decided that the callout is done after the Routing has been successfully executed.
A Service Callout only works with WSDL operation which implements the request/response message exchange pattern. One-way operations cannot be invoked by the Service Callout action, use the Publish action instead.
We will use a Service Callout action to call another service from a proxy service message flow.
Aadd an additional service call to another service Credit Card Info Service, which returns the credit card information. The service call will be done using the Service Callout action. Both the information from the Credit Card Info Service and from the Customer Service will then be merged by the XQuery transformation into one single response returned by the proxy service.
First, we will create a new business service which will wrap the additional Credit Card Info Service interface on the CRM system. In Eclipse OEPE, perform the following steps:
1. Create a new business service in the business folder and name it CreditCardInfoService.
2. On the General tab choose WSDL Web Service for the Service Type option and click Browse.
3. Click Consume and select URI from the Service Resource drop-down listbox.
4. Enter the endpoint URI of the soapUI mock service http://localhost:8090/mockCreditCardInfoServiceSOAP?WSDL into the URI field and click OK.
5. Select the CreditCardInfoServiceSOAP (port) node and click OK.
6. Confirm the pop-up window by clicking OK.
7. Rename the imported WSDL from mockCreditCardInfoServiceSOAP.wsdl to CreditCardInfoService.wsdl and move it into the wsdl folder.
By doing that, we have created the new business service. Now, let's add the Service Callout action to the proxy service calling the new business service. In Eclipse OEPE, perform the following steps:
8. Open the Message Flow tab of the CustomerManagement proxy service.
9. In the FindCustomer branch, right-click on the Response Action flow of the Routing action and select Insert Into | Communication | Service Callout to add a Service Callout action just before the Replace action. We want to enrich the message, before the transformation to the canonical format is made.
10. On the Properties tab of the Service Callout action, click Browse and select the CreditCardInfoService business service.
11. Select RetrieveCreditCardById from the Invoking drop-down listbox.
12. Select the Configure Soap Body option.
13. Enter creditCardInfoRequest into the Request Body field and creditCardInfoResponse into the Response Body field.

14. Insert an Assign action into the Request Action flow of the Service Callout action.
15. On the Properties tab of the Assign action, click on <Expression> and enter the following XML fragment into the Expression field:
<soap-env:Body>
<cred:RetrieveCreditCardById>
<id>{$body/cus:FindCustomer/ID/text()}</id>
</cred:RetrieveCreditCardById>
</soap-env:Body>
16. Navigate to the Namespace Definition tab, add a namespace with cred for the Prefix and http://www.crm.org/CreditCardInfoService/ for the URI field and click OK.
17. Enter creditCardInfoRequest into the Variable field.
We have added the Service Callout action to the proxy service. The message flow should look as shown in the following screenshot:

The result of the Service Callout action is available in the creditCardInfoResponse variable. We now have to adapt the XQuery transformation to merge the message from the Service Callout and the Routing into one single response message. In Eclipse OEPE, perform the following steps:
18. Open the TransformFindCustomerResponse.xq XQuery transformation and navigate to the Source tab.
19. Add an additional parameter to the XQuery transformation by adding the following line to the top:
(:: pragma bea:global-element-parameter parameter="$retrieveCreditCardInfoByIdResponse1" element="ns4:RetrieveCreditCardByIdResponse" location="../wsdl/CreditCardInfoService.wsdl" ::)
20. Declare an additional namespace:
declare namespace ns4 = "http://www.crm.org/CreditCardInfoService/";
21. Add the parameter to the declaration of the TransformFindCustomerResponse function:
declare function xf:TransformFindCustomerResponse ($retrieveCustomerByCriteriaResponse1 as element(ns0:RetrieveCustomerByCriteriaResponse), $retrieveCreditCardInfoByIdResponse1 as element(ns4:RetrieveCreditCardByIdResponse)) as element(ns3:FindCustomerResponse) { <ns3:FindCustomerResponse>
22. Declare an additional variable and add the variable to the invocation call:
declare variable $retrieveCreditCardInfoByIdResponse1 as element(ns4:RetrieveCreditCardByIdResponse) external;
xf:TransformFindCustomerResponse( $retrieveCustomerByCriteriaResponse1, $retrieveCreditCardInfoByIdResponse1)23. Navigate back to the Design tab and the new parameter with the Credit Card Info data will be shown. Map the credit card information to the FindCustomerResponse message. The mapping should look as shown in the following screenshot:

Last but not least we have to change the existing invoke of the XQuery in the Replace action so that the additional parameter is passed. In Eclipse OEPE, perform the following steps:
24. Select the Replace action following the Service Callout action and navigate to the Properties tab.
25. Click on the link to the right of Expression to reselect the XQuery transformation.
26. Click Browse, select the TransformFindCustomerResponse.xq XQuery resource and click OK.
27. Enter $body/ext:RetrieveCustomerByCriteriaResponse into the retrieveCustomerByCriteriaResponse1 field and $creditCardInfoResponse/ cred: RetrieveCreditCardByIdResponse into the retrieveCreditCardInfoByIdResponse1 field.
28. Click OK.
29. Deploy the project to the OSB server.
Now let's test the proxy service from soapUI:
30. Import the CustomerManagement-soapui-project.xml .
31. Double-click on Request 1 inside the FindCustomer operation.
32. Check that the endpoint of the proxy service is correctly set up in the drop-down listbox on the top.
33. Click on the green arrow to execute the test and make sure that the CreditCard information is returned in the response.

Testing the proxy service through soapUI - OSB Recipe 7
soapUI is such a specialized tool, which offers both a free as well as a pro version. The free version supports the testing web services with a lot of convenient functionalities.
Thanks to the standardization through web services, a tool such as soapUI can create the right requests for a service just by analyzing the provided WSDL of the service. SoapUI creates requests for each operation of the service. These requests are persisted in the soapUI project and they can be combined into a test suite. This allows them to be automatically executed, that is, they can be used together with continuous integration.
To perform this recipe, soapUI needs to be downloaded and installed. We can get it from here:
http://www.soapui.org.
In order to test the service from soapUI, we need to know the WSDL URL of the deployed proxy service.
The URL is constructed by the OSB at deployment time, based on the location of the OSB server (http://[OSBServer]:[Port]) and the endpoint URI specified in the proxy service (that is, /basic-osb-service/proxy/CustomerService). We need to concatenate the two and add the suffix ?wsdl to get the WSDL URL of the OSB proxy service:
http://localhost:7001/basic-osb-service/proxy/CustomerService?wsdl.
In soapUI, perform the following steps:
1. In the File menu, select New soapUI Project.
2. Enter the URL of the WSDL, for the service to be tested (http://localhost:7001/basic-osb-service/proxy/CustomerService?wsdl) into the Initial WSDL/WADL field.
3. Enter CustomerService into the Project Name field.
4. Click on the OK button.
SoapUI will analyze the WSDL and creates a project with some initial requests for all operations defined by the WSDL. Still in soapUI, perform the following steps:
5. Expand the project in the Navigator on the left.
6. Double-click on the Request 1 entry of the RetrieveCustomerByCriteria operation.

7. A new window for the Request 1 will open in the details section.
8. Replace the ? character in the request message on the left by the input parameter values for the test. The following screenshot shows the request with the ? characters replaced:

9. Click on the green arrow to start the test.
10. Check that a valid customer is returned in the response window on the right.
11. Save the soapUI project so that it is available to use later.
Validate that the response is correct
In soapUI, perform the following steps to validate the response from the proxy service against
the XML schema in the WSDL:
1. Right-click on the response message window and select Validate.
2. Either a pop-up window will appear indicating that the XML message is valid or the validation errors will be displayed in a window below the response message, as shown in the following screenshot:

Creating another request for the same operation
SoapUI supports more than one request per operation, so that a request can be created for each test case to be executed. It's recommended to properly name the different requests in order to be able to identify them later and to clearly indicate the case tested by a given request.
To rename a request, just right-click on the request and select Rename.
An existing request can also be cloned. This reduces the amount of work necessary to correctly set up all the information in the request message. To create a copy of a request, right-click on the request and select Clone Request.
To create a new request from scratch, right-click on the operation and select New request.
Testing the proxy service through the OSB console - OSB Recipe 6
Due to the fact that the interface of the proxy service is clearly defined through the WSDL, the OSB console is capable of showing us a sample test message in the Payload field.
If we have a proxy service without a WSDL, then testing that service will still be possible through that window, but there will no longer be a sample message shown, as the OSB console does not know about the structure.
Navigate to the OSB console and login as the Administrator (that is, weblogic).
In the OSB console, perform the following steps:
1. Click on the menu item Project Explorer on the left-hand side of the OSB console.
2. In the project tree, click on basic-osb-service and in the details section on the right, the project folder tree will be shown.
3. Click on the proxy link.
4. The proxy service Customer Service should be displayed in the details section (might have to scroll down to see it):

5. Click on the bug symbol in the Actions section (highlighted in red in the preceding screenshot) to open the test window for the Customer Service proxy service.
6. In the Proxy Service Testing window, make sure you select the right operation in the Available Operations drop-down list. We want to test the RetrieveCustomerByCriteria operation.
7. Change the Payload field as shown in the following screenshot:

8. Click on the Execute button to run the test. The test results are returned after a while in the same window:

9. Check that the right customer (with ID = 1) information is being returned by the OSB service.
10. Scroll down in the window to see the Invocation Trace section. This will show steps that the OSB proxy service has executed and values of the variables during execution:

Deploying the OSB configuration from Eclipse OEPE - OSB Recipe 5
Eclipse OEPE is creating a JAR file (a Java Archive) with all the artifacts which belong to the OSB configuration and deploys that archive to the OSB server.
The mechanism to deploy directly from Eclipse should only be used during development. Later when deploying to integration, quality assurance, or a production system, of course, a more automatic and reproducible way is necessary. This can be achieved through Apache Ant and WLST.
First we need to create the server reference inside Eclipse OEPE and after that we can deploy the OSB configuration with its projects to the server.
In Eclipse OEPE, perform the following steps to create a server:
1. Switch to the Servers tab and right-click in the empty window
.
2. Select New | Server.
3. In the Define a New Server window, select the right WebLogic Server version (Oracle WebLogic Server 11gR1 PatchSet 3).
4. Click on the Next button twice.
5. Select the Local option and select the Domain Directory of the local OSB server installation. If the Domain Directory drop-down list is empty, then click on Browse button to navigate to the domain directory on your machine:

6. Click on the Finish button.
Now the local OSB server is configured in Eclipse OEPE. The next step is to deploy the OSB configuration to this sever. Still in Eclipse OEPE, perform the following steps:
7. On the Servers tab, right-click on the server item that you just created and select Add and Remove.
8. In the Available list on the left, click on the osb-learnorasoa-configuration OSB configuration.
9. Click on Add to move it to the Configured list on the right and click on the Finish button.
10. The OSB configuration is deployed to the running OSB server and after a while the status will change from [Started] to [Started, Republish].
11. Right-click on the OSB server and select Publish.
12. After a while the status will change to [Started, Synchronized], indicating that Eclipse OEPE and the OSB server are synchronized.
13. Expand the tree and the status of each single OSB project within the OSB configuration is shown:

The OSB configuration is now successfully deployed and ready to be used.
Deploying to a remote server from Eclipse OEPE
Eclipse OEPE can also be used to deploy to a remote server. Just click on the Remote option when defining the WebLogic Server in the New Server wizard:

Creating an OSB Configuration Jar and use the OSB console to deploy it
An OSB configuration can also be deployed by using the OSB console. In Eclipse OEPE, perform the following steps:
1. In the Project Explorer, right-click on the OSB Configuration that you want to deploy to and select Export | Oracle Service Bus – Configuration Jar.
2. In the pop-up window, select the resources to export, enter the location of the configuration jar into the Jar File field and click on the Finish button.

In the OSB console, perform the following steps to import the Configuration Jar that we just created:
3. Select the menu System Administration on the left-hand side. You might have to use the scroll bar in order to see all the menu items.
4. Click on Create in the Change Center to start a new change session.
5. Click on the Import Resources button and use Browse to select the file created in the export (c:\temp\sbconfig.jar).
6. Click on the Next button.
7. Check that the right sources will be imported:

8. Click on the Import button to start the import.
9. The successful import is confirmed by the message the import was completed successfully.
10. Click on the Activate button in the Change Center.
11. Enter a text describing the changes into the Description field and click on the Submit button to activate
the changes.
If we need to adapt some properties like endpoint URI to match the target environment, we can use a customization file and apply that when doing the deployment.
Generating a simple pass-through proxy service - OSB Recipe 4
The proxy service offers the same SOAP-based web service interface as the business service/external service, so it's basically just doing a pass-through of the request and response message.
This can be handy if we want to use the OSB for adding an additional abstraction layer to apply service virtualization. If all the service consumers no longer access the external services directly, but only through the OSB proxy-service, a lot of the features of OSB can be used transparently by a service consumer, such as SLA monitoring and alerting, service pooling and throttling, or message validation. This directly supports the main goal of service virtualization—adding operational agility.
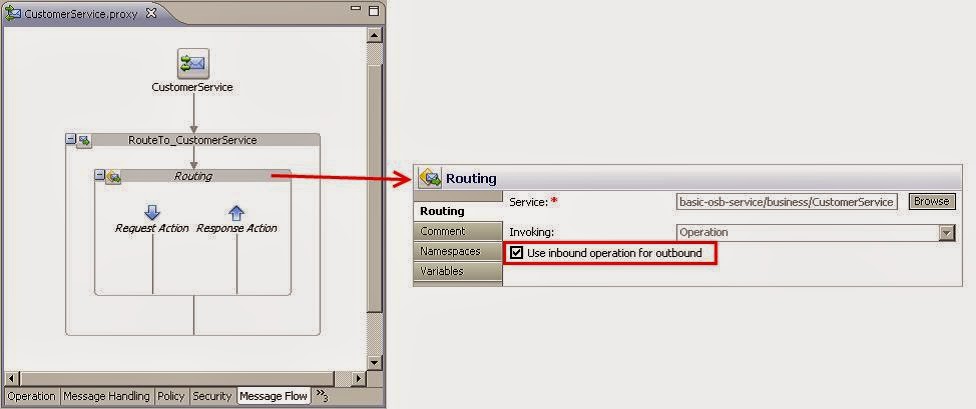
By setting the Invoking property to Use inbound operation for outbound, we make sure that the whole WSDL with all its operations is handled by one single Routing action. The inbound operation name on the proxy service is used as the outbound operation name invoked on the business service. Apart from the Routing action there are no other actions in this proxy service. By that, both the request and the response messages in the $body variable are not touched by the OSB. This guarantees that the overhead of adding OSB as a service virtualization layer has minimal impact on the performance.
The proxy service will allow a consumer to call our service on the OSB. If the OSB needs to support the same web service interface as the backend service does, then the quickest and easiest way is to create a pass-through service:

In Eclipse OEPE, perform the following steps:
1. In the project tree, right-click on the CustomerService.biz artifact and select Oracle Service Bus | Generate Proxy Service.
2. Enter CustomerService in the File name field and select the proxy folder for the location of the new proxy service.
3. Click on the Finish button.
4. Click on the Transport tab and check the value of the Endpoint URI field. It should be /basic-osb-service/proxy/CustomerService.
5. Navigate to the Message Flow tab and have a look at the message flow, which has been generated by Eclipse OEPE. A Route node with a nested Routing action has been created with its Invoking properties set to Use inbound operation for outbound:
Creating a business service to call an external SOAP-based web service - OSB recipe 3
The business service acts as a wrapper of our external service. Once created, we will no longer have to use the WSDL to refer to the external service, but can use the business service.
This forms an additional abstraction layer, which is applied before the real endpoint is invoked, such as SLA monitoring, service throttling, service pooling, and others. Sentence is too long, runs on too long. Would be better split into two sentences.

Verify that the service is running and available by asking it for its WSDL definition.
In Eclipse OEPE, perform the following steps:
1. In the project tree, right-click on the business folder and select New | Business Service.
2. Enter CustomerService into the File name field, check a second time that the business folder is selected, and click on the Finish button:

3. A new business service artifact is created in the business folder and the editor for the business service opens automatically.
4. Navigate to the General tab, if it does not already have the focus, and select the WSDL Web Service radio button.
5. Click on the Browse button and a pop up window will show up, where the WSDL resource of the external service to be wrapped, can be selected.
6. Click on the Consume button.
7. A second pop-up window will show up where the WSDL resource can be specified:

8. Select URI in the Service Resource drop-down listbox.
9. In the URI field, enter the URL of the WSDL resource to consume. The external service provides its WSDL through the following URL: http://localhost:8088/mockCustomerServiceSOAP?WSDL.
10. Click on the OK button and Eclipse will consume the WSDL from this URL.
11. Select the CustomerServiceSOAP port on the next window.
12. Click on the OK button.
13. Select Yes on the pop-up message window to confirm that the transport configuration settings will be overwritten by the information from the selected WSDL.
14. Save the OSB project by selecting File | Save.
15. In the Project Explorer, right-click on the imported WSDL file mockCustomerServiceSOAP.wsdl and select Rename. Enter CustomerService.wsdl into the New name field of the pop-up window and confirm.
16. In the Project Explorer, drag the CustomerService.wsdl file into the wsdl folder and drop it there. All the references to the WSDL file are automatically adapted by Eclipse OEPE.
17. Navigate to the Transport tab and check that the Endpoint URI has been replaced with the service endpoint setting from the WSDL that we consumed:

18. Save the artifact by selecting File | Save or by clicking on the Save toolbar button.